MP3 Flash Media Player ( Its Here )
8 posts
Page 1 of 1


Quick Profile
Information
Posts: 2870
Joined: Mon Jul 27, 2009 11:58 am View Full Profile
Hi Everyone
This is a Fantastic Tutorial on how to create your Own Fully Customisable Flash MP3 Player.
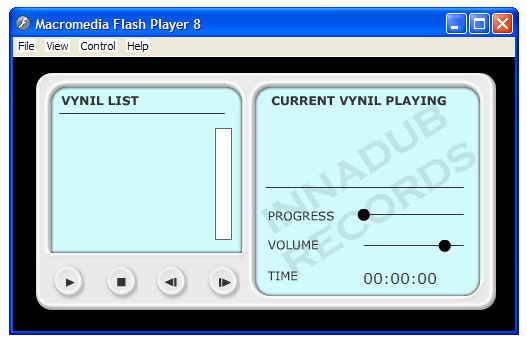
![Image]()
![Image]()
This images above are just a reference images cooll;
I was going to start this Tutorial from Scratch, But when I have posted Tutorials ( Photoshop one's spring to mind) there are People saying "Its TOO Hard", or TOO MUCH Code. Well You cant Please everyone and i am spending my time doing this for you all so you can learn NEW STUFF, But if you do not have the Brain for FLASH then you can just download the Finished Project and change the XML File and add your own Tracks.
Well for that reason I have decided to start this Tutorial without going into Photoshop (and designing the Interface ) and have decided to start this with the Interface already done and Concentrate on the FLASH Side of things.
Ok Lets get stuck in wahooo;
Download the files i have put here as attachment
( the Image may differ from the one i have put on here ) but will work all the same.)
Open Flash 8 or Flash MX ( It will work in both Versions)
Goto "File" Menu, choose IMPORT to Library and Import both the Interface and the Button.
Press CTRL+L to Open the Library
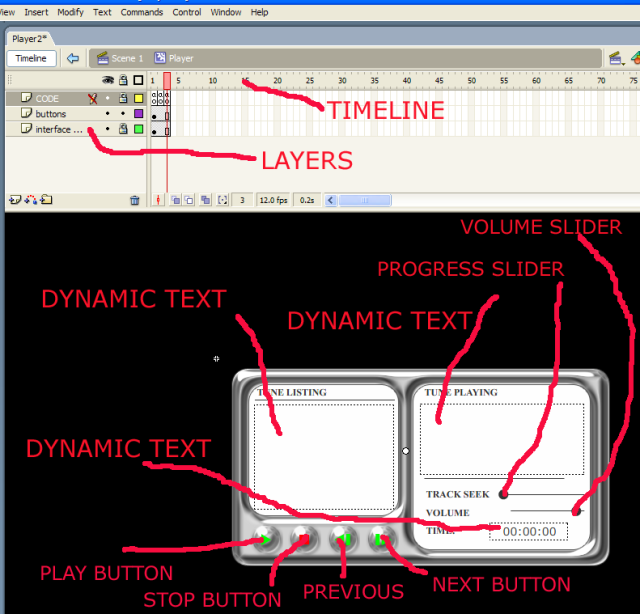
Create a New Folder ( called "whatever YOU LIKE") and Drop both Graphics (Interface + Button) inside.
Hit the "Plus" Symbol at the bottom of the Library and create a MOVIE CLIP called "Player"
In your New Movie Clip, Drag the Interface.png from the Library onto the Stage and Position it using the PROPERTIES PALLETTE at "0" on the X and Y axis.
Select Frame 3 and Press F5 to Extend the Timeline
Rename the Layer "Interface Back" by clicking on the Layer 1 name.
Create a New Layer above the "INTERFACE BACK LAYER" and Name it "BUTTONS"
Click the "Plus" Icon on the Library and create a "NEW BUTTON", Naming it "Generic Button"
Drag the Button.png graphic from the library and Place it on the Crosshairs ( on the Stage)
(*TIP...Use the Align Pallette to align the button Horizontal and Vertical, so that it sits central in the middle of the Crosshairs.)
Select the "HIT STATE" of the Button and press F5 to Extend the Timeline
Now Create a New Layer above in the Button Timeline and SELECT "OVER" and press F6
Select the "OVAL" TOOL and choose a colour that is Darker than your Button
In the "Colour Mixer" turn down the "ALPHA" Value to 30% and now "Draw a Circle" over the top of your Button, This should be SEMI TRANSPARENT when you click off it.
DoubleClick the Player MOVIE CLIP in the Library to return to it.
Now Drag 4 Instances of the "GENERIC BUTTON" Onto the "Buttons Layer"
and Position them like the image above
![Image]()
Now use the Drawing tools to Draw the Icons as shown in the pic below
(*TIP...Draw them to the side of the stage and then "Group each one" ( CTRL+G ) before placing them on the Buttons,Otherwise they will go behind the Buttons)
Add the Text as Shown above in the Pic, Using a font of your Choice.
Select the PLAY BUTTON (Click on it ) then Press F9 to open the "ACTIONSCRIPT WINDOW"
And copy and paste this Code into it. (*Tip.. you will need to be in EXPERT MODE to paste CODE into the ACTIONSCRIPT Window )
PLAY BUTTON CODE
This is the Code which will Power the Forward and Backward Options for each Track, and Play and Stop each Track from the XML Code.
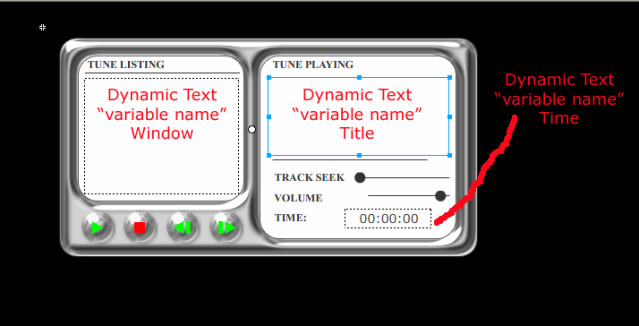
Using the "TEXT TOOL" add the Headings for "TRACK LIST", CURRENT TRACK", "PROGRESS", "VOLUME" AND "TIME" As shown in the Pic Below.
Use the "LINE TOOL" And add a couple of Darkish Lines like in the Pic ABOVE.
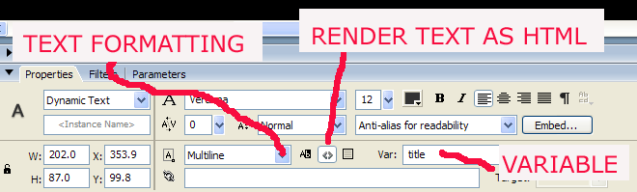
Create a "TEXTBOX" Onscreen and "CHANGE" the OPTION from "STATIC TEXT" "" to "DYNAMIC TEXT" in the Properties Pallette.
![Image]()
![Image]()
Then add a "VARIABLE" Name of "Window" and Format the "TEXT" as previously.
Click on the "SECOND ICON" next to "SINGLE LINE" to Render the TEXT as HTML, and make sure that "NONE" of the other ICONS are Selected.
Add another "TEXTBOX" under the "CURRENT TRACK" Heading, and as previously make it a "DYNAMIC TEXTBOX" with the "VARIABLE of "Title"
Now select the center "ICON" next to "Single Line", Click the DropBox and change it from "SINGLE LINE" to "MULTILINE" and make the text slightly bigger this time.
The Final "DYNAMIC TEXTBOX" is to go next to the "TIME" Heading
Make this a "SINGLE LINE" textbox with a "VARIABLE" of "Time".
In the "TEXTBOX" Itself you can TYPE "00:00:00" to represent Hours,Minutes and Seconds, This will be replaced later Dynamically by ACTIONSCRIPT when an MP3 is Played.
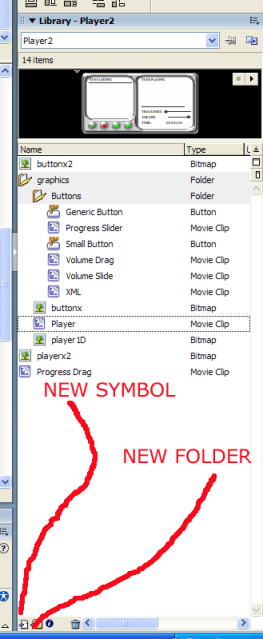
In the Library, ADD a Folder and name it "Buttons", then Drag the Button called "Generic Button" into the new folder
Now click the "Plus" icon at the Bottom of the Library and Create a "NEW SYMBOL" And name this "Small Button" and making its behaviour a BUTTON, Now ClicK OK.
Use the "Oval Tool" to draw a "CIRCLE", In the Properties, Amend its Height and Width to "12 Pixels", Make the Colour the same as the other Colour you used previously
and remove the stroke.
Select the "HIT FRAME" and press "F5" to extend the Timeline to this Frame.
Now Click the "NEW SYMBOL" Icon in the Library and NAME your NEW SYMBOL "Progress Drag" with the Behaviour of a "MOVIE CLIP" A new Timeline will appear with your Stage Clear.
Drag into the Stage the "Small Button" from the Library and click it once to "SELECT IT"
Now press F9 to open the ACTIONSCRIPT Window
and copy and paste this code into the Actionscript Window
Create another "NEW SYMBOL" making its Behaviour a "MOVIE CLIP" and name it "Progress Slider", Again there is a NEW Timeline and a Clear Stage
Select the "LINE TOOL" and Draw a HORIZONTAL LINE on the screen and select it, In the Properties Pallette, Make its "Width" 100 Pixels
With the "Line" Selected "Change its "X" And "Y" Location to "0" in the Properties Pallette.
Create a "NEW LAYER" and "Drag" the "Progress Drag" Symbol onto the new Layer (the stage) Place it over the "Left Hand Side" of the "Line", IT SHOULD "Snap into place", Give it an "Instance Name of "DragMe" in the Properties Pallette.
Select the Button and press F9 and Paste this Code Below into the Button "ActionScript Window"
Now double Click the "PLAYER" SYMBOL in the Library to open the Interface
With the "Button LAYER" Selected, Drag the Symbol "Progress Slider" onto the stage and position it as in the Pic above, Giving it an "Instance Name" of SlideMe"
We now need to make the "Volume Slider"
Create a "New" SYMBOL , naming it "Volume Drag" and make it a "MOVIE CLIP Behaviour
Drag the "Small Button" SYMBOL onto the Stage
Press F9 to open the "ActionScript Window"
Paste this Code Below into the "Actionscript Window"
This time Name it "Volume Slide"
Draw a line and Position it at "0" Pixels on the "X" and "Y" axis in the Propertie Pallette
Make its width "100" Pixels so that it is consistant with the previous slider
Create a NEW Layer, Select it, Click on "Volume drag" and move it onto the Stage
Position it at "75" on the "X" axis and "-6" on the "Y" axis in the Propertie Palette
This will make the Initial Volume around "75%" so that it is audable when first Playing.
Once again we need to add some "Actionscript" to this Button
Select the "Button" and Press F9
And paste this code below into the "ActionScript Window"
Double click the "Player" SYMBOL in the Library and "Drag" the SYMBOL "Volume Slider" from the Library onto the Stage, Position it Directly Under the Progress Slider. This completes Both the Sliders, Which is probably the most Complex part of the building process because of the "Nested Clips".
Create a NEW Layer and rename it "Code" by Double clicking on the Name
Now select frame "1" and Press F9 To open the "ActionScript Panel"
Copy and Paste this Code Below into the "ActionScript Panel"
Select Frame "2" of the "Code" Layer and Press "F6" to add a "Keyframe" to the Timeline
Press "F9" to open the "ActionScript Panel"
Copy and Paste this Code Below into the "ActionScript Panel"
Select Frame "3" of the "Code" Layer and press "F6" to add another Keyframe to the Timeline
Press "F9" to open the "Actionscript Panel"
and Paste this code Below in the "Actionscript Panel
Create a "NEW" SYMBOL in the "LIBRARY" and name it "XML", Giving it the Behaviour of a "MOVIE CLIP"
A new timeline and Blank Stage will appear
Select Frame "1" and Press "F9" to open the "Actionscript Window"
Paste in the Actionscript window this code below
Select Frame "2" and Press "F6" to add a New Keyframe to the Timeline
Press "F9" to open the "Actionscript Panel"
and paste into the "Actionscript" Window the code below
Select Frame "3" and Press "F6" to add a new Keyframe to the Timeline
Press "F9" to open the "Actionscript Panel"
Copy and paste this code below into the "Actionscript Panel
Select Frame "4" and Press "F6" to add a Keyframe to the Timeline
Press "F9" to open the "Actionscript Panel
Paste in the code Below
Double click on the "Player" SYMBOL in the Library
Select the "Buttons" Layer
And "Drag" the "XML" from the Library onto the Stage
It can go anywhere as its "INVISIBLE"
Select "Scene 1" from under the Timeline and "Drag" the "Player" SYMBOL onto the Stage
Now Press "Ctrl+Enter" on the Keyboard to "Publish Your File".
YOU SHOULD GET AN ERROR IN THE OUTPUT WINDOW
Because we haven't created the "XML" File for the Project Yet.
Save your Flash File and Minimise Flash for now
Open either a Plain Text Editor or Open DreamweaverMX and create an "XML" File
Copy and Paste the code Below,
But Replace "Track 1" with the Name of your Track and replace "Track1.mp3" with the name of the MP3
Now save as "Tracklist.xml
Finally Place your XML Document and Your MP3's in the same Foldwer as your Flash Document
Maximise Flash and Press Ctrl+Enter on the Keyboard.
Your Tracklist should now appear and you can control the Music with the Buttons on the right of the Screen.
I hope this is some help to you all, I KNOW IT LOOKS COMPLICATED, But it isn't....I have made about 100 of these Players cooll; over the years of all different shapes and sizes....
* YOU CAN ADD AS MANY TRACKS AS YOU LIKE TOO THIS, JUST UPDATE THE .XML FILE WITH ALL YOUR TRACKS.
If you cant be bothered to Learn Flash then download the Completed Player ( The Attachment ) and Open the Tracklist.XML File and add your tracks to the XML doc, then SAVE and Double click the Player.swf file for your Player to work...You can add the Player to your Website so everyone can play your sounds on your site. Or use it as a MP3 Player on your Computer.
If you want to give it to anyone else so they can run it on there site or computer
You must give them the Flash.swf Player file and the tracklist.XML document.
Chris
This is a Fantastic Tutorial on how to create your Own Fully Customisable Flash MP3 Player.
This images above are just a reference images cooll;
I was going to start this Tutorial from Scratch, But when I have posted Tutorials ( Photoshop one's spring to mind) there are People saying "Its TOO Hard", or TOO MUCH Code. Well You cant Please everyone and i am spending my time doing this for you all so you can learn NEW STUFF, But if you do not have the Brain for FLASH then you can just download the Finished Project and change the XML File and add your own Tracks.
Well for that reason I have decided to start this Tutorial without going into Photoshop (and designing the Interface ) and have decided to start this with the Interface already done and Concentrate on the FLASH Side of things.
Ok Lets get stuck in wahooo;
Download the files i have put here as attachment
( the Image may differ from the one i have put on here ) but will work all the same.)
Open Flash 8 or Flash MX ( It will work in both Versions)
Goto "File" Menu, choose IMPORT to Library and Import both the Interface and the Button.
Press CTRL+L to Open the Library
Create a New Folder ( called "whatever YOU LIKE") and Drop both Graphics (Interface + Button) inside.
Hit the "Plus" Symbol at the bottom of the Library and create a MOVIE CLIP called "Player"
In your New Movie Clip, Drag the Interface.png from the Library onto the Stage and Position it using the PROPERTIES PALLETTE at "0" on the X and Y axis.
Select Frame 3 and Press F5 to Extend the Timeline
Rename the Layer "Interface Back" by clicking on the Layer 1 name.
Create a New Layer above the "INTERFACE BACK LAYER" and Name it "BUTTONS"
Click the "Plus" Icon on the Library and create a "NEW BUTTON", Naming it "Generic Button"
Drag the Button.png graphic from the library and Place it on the Crosshairs ( on the Stage)
(*TIP...Use the Align Pallette to align the button Horizontal and Vertical, so that it sits central in the middle of the Crosshairs.)
Select the "HIT STATE" of the Button and press F5 to Extend the Timeline
Now Create a New Layer above in the Button Timeline and SELECT "OVER" and press F6
Select the "OVAL" TOOL and choose a colour that is Darker than your Button
In the "Colour Mixer" turn down the "ALPHA" Value to 30% and now "Draw a Circle" over the top of your Button, This should be SEMI TRANSPARENT when you click off it.
DoubleClick the Player MOVIE CLIP in the Library to return to it.
Now Drag 4 Instances of the "GENERIC BUTTON" Onto the "Buttons Layer"
and Position them like the image above
Now use the Drawing tools to Draw the Icons as shown in the pic below
(*TIP...Draw them to the side of the stage and then "Group each one" ( CTRL+G ) before placing them on the Buttons,Otherwise they will go behind the Buttons)
Add the Text as Shown above in the Pic, Using a font of your Choice.
Select the PLAY BUTTON (Click on it ) then Press F9 to open the "ACTIONSCRIPT WINDOW"
And copy and paste this Code into it. (*Tip.. you will need to be in EXPERT MODE to paste CODE into the ACTIONSCRIPT Window )
PLAY BUTTON CODE
Code: Select all
STOP BUTTON CODE
on (release) {
	if (playing == undefined or playing == false) {
		song = new Sound(this);
		song.loadSound(tracks.firstChild.childNodes[nodeNum].attributes.path);
		title = tracks.firstChild.childNodes[nodeNum].attributes.name;
		if (pause == true) {
			pausePos = ((slideMe.dragMe._x/100)*song.duration)/1000;
			song.start(pausePos, 0);
			pause = false;
		} else {
			song.start(0, 0);
		}
		playing = true;
		gotoAndPlay(2);
	}
}Code: Select all
PREVIOUS TRACK CODE
on (release) {
	stopAllSounds();
	playing = false;
	pause = false;
	time = "00:00:00";
	gotoAndStop(1);
}Code: Select all
NEXT TRACK CODE
on (release) {
	if (nodeNum>0) {
		nodeNum--;
		title = tracks.firstChild.childNodes[nodeNum].attributes.name;
		path = tracks.firstChild.childNodes[nodeNum].attributes.path;
		if (playing == true) {
			stopAllSounds();
			song.loadSound(path, false);
			song.start(0, 1);
		}
	}
}Code: Select all
Copy the Code for each of the Buttons, selecting them in Flash then pasting it into the ActionScript Panel for each.on (release) {
if(nodeNum < tracks.firstChild.childNodes.length-1){
nodeNum++;
title = tracks.firstChild.childNodes[nodeNum].attributes.name;
path = tracks.firstChild.childNodes[nodeNum].attributes.path;
if(playing == true){
stopAllSounds();
song.loadSound(path, false);
song.start(0, 1);
}
}
}This is the Code which will Power the Forward and Backward Options for each Track, and Play and Stop each Track from the XML Code.
Using the "TEXT TOOL" add the Headings for "TRACK LIST", CURRENT TRACK", "PROGRESS", "VOLUME" AND "TIME" As shown in the Pic Below.
Use the "LINE TOOL" And add a couple of Darkish Lines like in the Pic ABOVE.
Create a "TEXTBOX" Onscreen and "CHANGE" the OPTION from "STATIC TEXT" "" to "DYNAMIC TEXT" in the Properties Pallette.
Then add a "VARIABLE" Name of "Window" and Format the "TEXT" as previously.
Click on the "SECOND ICON" next to "SINGLE LINE" to Render the TEXT as HTML, and make sure that "NONE" of the other ICONS are Selected.
Add another "TEXTBOX" under the "CURRENT TRACK" Heading, and as previously make it a "DYNAMIC TEXTBOX" with the "VARIABLE of "Title"
Now select the center "ICON" next to "Single Line", Click the DropBox and change it from "SINGLE LINE" to "MULTILINE" and make the text slightly bigger this time.
The Final "DYNAMIC TEXTBOX" is to go next to the "TIME" Heading
Make this a "SINGLE LINE" textbox with a "VARIABLE" of "Time".
In the "TEXTBOX" Itself you can TYPE "00:00:00" to represent Hours,Minutes and Seconds, This will be replaced later Dynamically by ACTIONSCRIPT when an MP3 is Played.
In the Library, ADD a Folder and name it "Buttons", then Drag the Button called "Generic Button" into the new folder
Now click the "Plus" icon at the Bottom of the Library and Create a "NEW SYMBOL" And name this "Small Button" and making its behaviour a BUTTON, Now ClicK OK.
Use the "Oval Tool" to draw a "CIRCLE", In the Properties, Amend its Height and Width to "12 Pixels", Make the Colour the same as the other Colour you used previously
and remove the stroke.
Select the "HIT FRAME" and press "F5" to extend the Timeline to this Frame.
Now Click the "NEW SYMBOL" Icon in the Library and NAME your NEW SYMBOL "Progress Drag" with the Behaviour of a "MOVIE CLIP" A new Timeline will appear with your Stage Clear.
Drag into the Stage the "Small Button" from the Library and click it once to "SELECT IT"
Now press F9 to open the ACTIONSCRIPT Window
and copy and paste this code into the Actionscript Window
Code: Select all
This code will allow the user to Drag the Button and Jump to different Durations in the song.on (press) {
dragging = true;
startDrag(this, false, 0, 0, 100, 0);
}
on (release, releaseOutside) {
if (_parent._parent.playing == true) {
newPos = ((this._x/100)*_parent._parent.song.duration)/1000;
stopAllSounds();
_parent._parent.song.start(newPos, 0);
dragging = false;
} else if(_parent._parent.pause != true){
this._x = 0;
}
stopDrag();
}Create another "NEW SYMBOL" making its Behaviour a "MOVIE CLIP" and name it "Progress Slider", Again there is a NEW Timeline and a Clear Stage
Select the "LINE TOOL" and Draw a HORIZONTAL LINE on the screen and select it, In the Properties Pallette, Make its "Width" 100 Pixels
With the "Line" Selected "Change its "X" And "Y" Location to "0" in the Properties Pallette.
Create a "NEW LAYER" and "Drag" the "Progress Drag" Symbol onto the new Layer (the stage) Place it over the "Left Hand Side" of the "Line", IT SHOULD "Snap into place", Give it an "Instance Name of "DragMe" in the Properties Pallette.
Select the Button and press F9 and Paste this Code Below into the Button "ActionScript Window"
Code: Select all
This code tells the Button where to move if its not being Dragged.onClipEvent(enterFrame){
if(dragging != true){
this._x = (_parent._parent.song.position/_parent._parent.song.duration) * 100;
}
}Now double Click the "PLAYER" SYMBOL in the Library to open the Interface
With the "Button LAYER" Selected, Drag the Symbol "Progress Slider" onto the stage and position it as in the Pic above, Giving it an "Instance Name" of SlideMe"
We now need to make the "Volume Slider"
Create a "New" SYMBOL , naming it "Volume Drag" and make it a "MOVIE CLIP Behaviour
Drag the "Small Button" SYMBOL onto the Stage
Press F9 to open the "ActionScript Window"
Paste this Code Below into the "Actionscript Window"
Code: Select all
Create a "New" SYMBOL and as before make it a "MOVIE CLIP"on (press) {
dragging = true;
startDrag(this, false, 0, 0, 100, 0);
}
on (release, releaseOutside) {
dragging = false;
stopDrag();
}
This time Name it "Volume Slide"
Draw a line and Position it at "0" Pixels on the "X" and "Y" axis in the Propertie Pallette
Make its width "100" Pixels so that it is consistant with the previous slider
Create a NEW Layer, Select it, Click on "Volume drag" and move it onto the Stage
Position it at "75" on the "X" axis and "-6" on the "Y" axis in the Propertie Palette
This will make the Initial Volume around "75%" so that it is audable when first Playing.
Once again we need to add some "Actionscript" to this Button
Select the "Button" and Press F9
And paste this code below into the "ActionScript Window"
Code: Select all
This code sets the Volume of the Song played based on the position of the SlideronClipEvent(enterFrame){
_parent._parent.song.setVolume(this._x);
}Double click the "Player" SYMBOL in the Library and "Drag" the SYMBOL "Volume Slider" from the Library onto the Stage, Position it Directly Under the Progress Slider. This completes Both the Sliders, Which is probably the most Complex part of the building process because of the "Nested Clips".
Create a NEW Layer and rename it "Code" by Double clicking on the Name
Now select frame "1" and Press F9 To open the "ActionScript Panel"
Copy and Paste this Code Below into the "ActionScript Panel"
Code: Select all
This Code ABOVE Populates the "Track Listings" in the Windows Dynamic textbox.firstLoad = true;
nodeNum = 0;
if(pause != true){
time = "00:00:00";
}
var array = new Array ();
var xml = new XML ();
xml.onLoad = function ()
{
var header, link;
for (var i = 0; i < this.firstChild.childNodes.length; i++){
if (this.firstChild.childNodes[i].nodeName != null){
header = this.firstChild.childNodes[i].attributes.name;
link = this.firstChild.childNodes[i].attributes.path;
array.push (new struct (header, link));
}
}
window = "";
for (i = 0; i < array.length; i++){
window += "<a href=\"" + array[i].link + "\">" + array[i].header + "</a><br>";
}
};
function struct (header, link)
{
this.header = header;
this.link = link;
}
xml.load ("tracklist.xml");
stop();Select Frame "2" of the "Code" Layer and Press "F6" to add a "Keyframe" to the Timeline
Press "F9" to open the "ActionScript Panel"
Copy and Paste this Code Below into the "ActionScript Panel"
Code: Select all
This code ABOVE sets up the Time in Hours/Mins and Seconds for the Duration of the Track.myTime = new Date();
myTime.setSeconds(song.position/1000);
myTime.setMinutes((song.position/1000)/60);
myTime.setHours((song.position/1000)/120);
seconds = myTime.getSeconds();
minutes = myTime.getMinutes();
hours = myTime.getHours();
if(seconds < 10){
seconds = 0 + seconds.toString();
}
if(minutes < 10){
minutes = 0 + minutes.toString();
}
if(hours < 10){
hours = 0 + hours.toString();
}
time = hours + ":" + minutes + ":" + seconds;Select Frame "3" of the "Code" Layer and press "F6" to add another Keyframe to the Timeline
Press "F9" to open the "Actionscript Panel"
and Paste this code Below in the "Actionscript Panel
Code: Select all
This Code ABOVE checks to see that a song is playing and sends the Playhead to the appropriate Frame.if(playing == true){
gotoAndPlay(2);
}else{
gotoAndStop(1);
}Create a "NEW" SYMBOL in the "LIBRARY" and name it "XML", Giving it the Behaviour of a "MOVIE CLIP"
A new timeline and Blank Stage will appear
Select Frame "1" and Press "F9" to open the "Actionscript Window"
Paste in the Actionscript window this code below
Code: Select all
This code ABOVE initiates the Loading of the "XML" File to play the Tracks._parent.tracks = new XML();
_parent.tracks.ignoreWhite = true;
_parent.tracks.load("tracklist.xml");
totalBytes = -1;Select Frame "2" and Press "F6" to add a New Keyframe to the Timeline
Press "F9" to open the "Actionscript Panel"
and paste into the "Actionscript" Window the code below
Code: Select all
This code ABOVE checks to see that all the Information has Loaded from the "XML" File, If it has it pushes the Playhead over to Frame 4 to Stop, otherwise it carries on loading the content.if(total !=-1){
myLoaded =_parent.tracks.getBytesLoaded();
total =_parent.tracks.getBytesTotal();
if(myLoaded == total and myLoaded > 0){
gotoAndStop(4);
}
}
total =_parent.tracks.getBytesTotal();Select Frame "3" and Press "F6" to add a new Keyframe to the Timeline
Press "F9" to open the "Actionscript Panel"
Copy and paste this code below into the "Actionscript Panel
Code: Select all
This Code ABOVE Loops the Playhead back to the previous frame to check if all the Data from the "XML" file has Loaded into Flash Yet.gotoAndPlay(2);Select Frame "4" and Press "F6" to add a Keyframe to the Timeline
Press "F9" to open the "Actionscript Panel
Paste in the code Below
Code: Select all
Which completes the "XML" Movie ClipStop()Double click on the "Player" SYMBOL in the Library
Select the "Buttons" Layer
And "Drag" the "XML" from the Library onto the Stage
It can go anywhere as its "INVISIBLE"
Select "Scene 1" from under the Timeline and "Drag" the "Player" SYMBOL onto the Stage
Now Press "Ctrl+Enter" on the Keyboard to "Publish Your File".
YOU SHOULD GET AN ERROR IN THE OUTPUT WINDOW
Because we haven't created the "XML" File for the Project Yet.
Save your Flash File and Minimise Flash for now
Open either a Plain Text Editor or Open DreamweaverMX and create an "XML" File
Copy and Paste the code Below,
Code: Select all
<tracks>
	<track name="Your Track Name" path="TRACK.MP3"/>
	<track name="Your Track Name" path="TRACK.MP3"/>
	<track name="Your Track Name" path="TRACK.MP3"/>
	<track name="Your Track Name" path="TRACK.MP3"/>
	<track name="Your Track Name" path="TRACK.MP3"/>
	<track name="Your Track Name" path="TRACK.MP3"/>
	<track name="Your Track Name" path="TRACK.MP3"/>

</tracks>
But Replace "Track 1" with the Name of your Track and replace "Track1.mp3" with the name of the MP3
Now save as "Tracklist.xml
Finally Place your XML Document and Your MP3's in the same Foldwer as your Flash Document
Maximise Flash and Press Ctrl+Enter on the Keyboard.
Your Tracklist should now appear and you can control the Music with the Buttons on the right of the Screen.
I hope this is some help to you all, I KNOW IT LOOKS COMPLICATED, But it isn't....I have made about 100 of these Players cooll; over the years of all different shapes and sizes....
* YOU CAN ADD AS MANY TRACKS AS YOU LIKE TOO THIS, JUST UPDATE THE .XML FILE WITH ALL YOUR TRACKS.
If you cant be bothered to Learn Flash then download the Completed Player ( The Attachment ) and Open the Tracklist.XML File and add your tracks to the XML doc, then SAVE and Double click the Player.swf file for your Player to work...You can add the Player to your Website so everyone can play your sounds on your site. Or use it as a MP3 Player on your Computer.
If you want to give it to anyone else so they can run it on there site or computer
You must give them the Flash.swf Player file and the tracklist.XML document.
Chris
You do not have the required permissions to view the files attached to this post.
Last edited by hungryhounduk on Tue Jan 05, 2010 10:12 pm, edited 9 times in total.


Quick Profile
Information
Posts: 1564
Joined: Sun Dec 20, 2009 2:12 pm View Full Profile
Looks good, i cant code in flash or as3 or whatever language it is coded in :P

Quick Profile
Information
Posts: 2870
Joined: Mon Jul 27, 2009 11:58 am View Full Profile
Looks good, i cant code in flash or as3 or whatever language it is coded inHi Lewis
Its Action Script cooll;
I will supply all the code and i will put the SOURCE FILES up on here as well, so IF anyone cant be bothered, they can download the 2 Files and add their own Tracks to the XML Document.
Chris
Quick Profile
Information
Posts: 1564
Joined: Sun Dec 20, 2009 2:12 pm View Full Profile
Yeah its coded in as i thought it would be

Quick Profile
Information
Posts: 4389
Joined: Tue Aug 04, 2009 1:47 am View Full Profile
Hello,
Some flash tutorials ive been wanting to learn flash for quite a while, everytime I try it all goes wrong lol.
That looks like C# code actually ..infact its almost perfectly identical :? I never realised that before lol I should be able to pick this up really quick
Thanks hungryhounduk cooll;
Some flash tutorials
That looks like C# code actually ..infact its almost perfectly identical :? I never realised that before lol I should be able to pick this up really quick
Thanks hungryhounduk cooll;
Welcome to CodenStuff.com Learn Code, Love Code. Thank you for being a member of the community.
Quick Profile
Information
Posts: 2870
Joined: Mon Jul 27, 2009 11:58 am View Full Profile
Hi Codenstuff
For a man with your Coding Abilities cooll; you should take to Flash like a Duck to Water clapper; wahooo;
As its so similar to C# i think you will pick it up in no time
And add another string to your Bow (so to speak)
Cheers
Chris
For a man with your Coding Abilities cooll; you should take to Flash like a Duck to Water clapper; wahooo;
As its so similar to C# i think you will pick it up in no time
And add another string to your Bow (so to speak)
Cheers
Chris

Quick Profile
Information
Posts: 338
Joined: Sun Jan 03, 2010 8:36 am View Full Profile
I am making this in Sothink SWF Quicker... And i can't get it to work right... HELP!!!

Quick Profile
Information
Posts: 2870
Joined: Mon Jul 27, 2009 11:58 am View Full Profile
I am making this in Sothink SWF QuickerhI
If you are making this in another Program ( NOT FLASH 8 Pro/Flash MX ) Then i really cant HELP as i only deal with FLASH 8 Pro/Flash MX, and as this was written Especiallly for and coded for ( Flash 8 Pro ) then it probably wont work in any other Package like i have explained in the Tutorial..
Sorry About That
Chris
8 posts
Page 1 of 1
Copyright Information
Copyright © Codenstuff.com 2020 - 2023