3D Max Tutorial = Objects following a Path
Post your tutorials in here for using various 3D software. Modeling, Animation etc.
3 posts
Page 1 of 1


Quick Profile
Information
Posts: 2870
Joined: Mon Jul 27, 2009 11:58 am View Full Profile
Hey Peeps
This is just one of many tutorials that i will be putting up on here all dealing with 3DS MAX v10
***THESE ARE FOR BEGINNERS WHO DONT KNOW 3DS MAX***
This one is about Objects following a Path, this is just so easy and you can use this and adapt it ( i will be posting other tuts as well explaining HOW TO GET THAT ONE STEP FURTHER ) and make a Theme Park Ride Rollercoaster cooll;
Right Lets get Down and Dirty with 3DS MAX
Open the Splines Toolbox
![Image]()
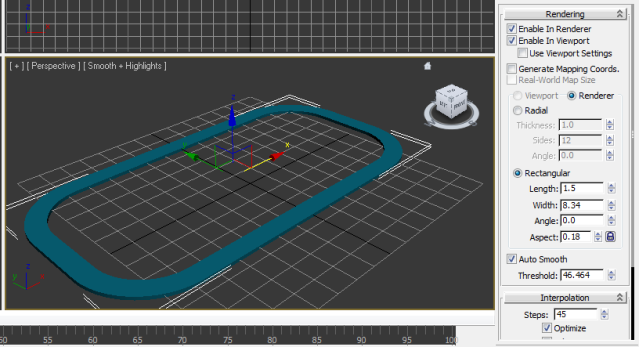
Choose the Rectangle Spline from the list and click in the top viewport and Drag out a Rectangle
Modify the Rectangle Spline from the Toolbox Options as in the Pic Below.
![Image]()
We are now going to CLONE/DUPLICATE the Spline, So that we have 2 of them
Select the Spline in the PERSPECTIVE Viewport, and CLICK and DRAG the SPLINE while holding the Shift Key
You should have a dialog box pop up and CHOOSE COPY from the Options, then click OK
***YOU SHOULD NOW HAVE 2 SPLINES IDENTICAL
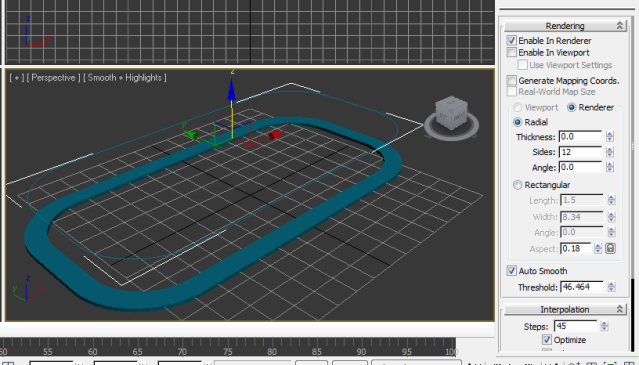
Modify the NEW SPLINE like in the Pic Below,
I have changed my SPLINE to a RADIAL
Use the OPTIONS in the Toolbox to MODIFY your SPLINE.
![Image]()
Next create a SPHERE from the STANDARD PRIMATIVES MENU
and you can put it where you like as we will be Linking it
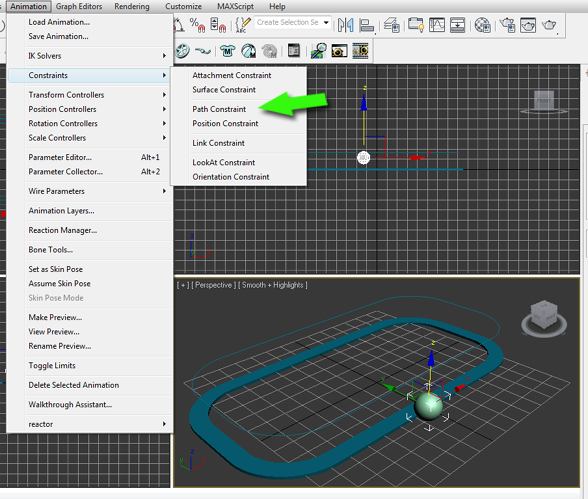
With the SPHERE SELECTED goto the ANIMATION TAB at the top of the SCREEN
![Image]()
Choose PATH CONSTRAINT
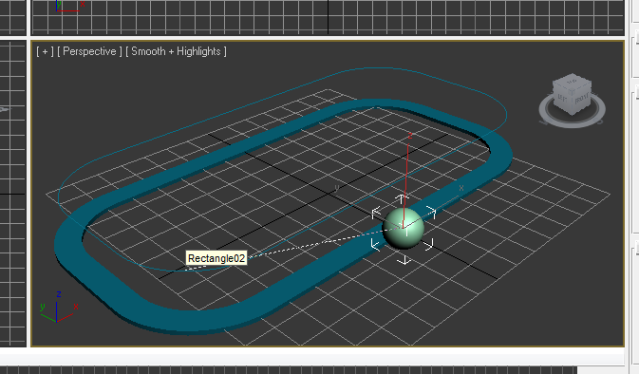
A LINK PATH LINE will appear and you Click your RADIAL SPLINE to ASSIGN IT
![Image]()
Your Sphere will JUMP onto your Path and its now Assigned to that Path as an Animation
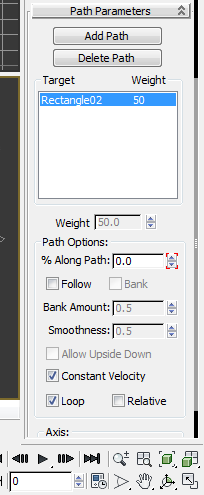
Using the Options in the Toolbox
You can get your SPHERE or any other Shape you design to follow the Path and Use Banking ( like a Jetfighter does ), You can from these options change Speed,Smoothness.
![Image]()
If you click the PLAY Button on the Bottom of the Screen your Sphere or whatever you want as the follow Object will be following the Path...
***If you look at the Rendering Options on the right, You can CHECK/UNCHECK show in Renderer/Viewport, This will hide the Second Spline (The Path) so that it will not show in the Animation/Rendering...
This was a very Simple Tutorial on the Use of PATH CONSTRAINT in 3DS MAX
Attachment below if you want a simple demo Video ( its in QUICKTIME .MOV Format ) cooll;
More to come
Chris
This is just one of many tutorials that i will be putting up on here all dealing with 3DS MAX v10
***THESE ARE FOR BEGINNERS WHO DONT KNOW 3DS MAX***
This one is about Objects following a Path, this is just so easy
Right Lets get Down and Dirty with 3DS MAX
Open the Splines Toolbox

Choose the Rectangle Spline from the list and click in the top viewport and Drag out a Rectangle
Modify the Rectangle Spline from the Toolbox Options as in the Pic Below.
We are now going to CLONE/DUPLICATE the Spline, So that we have 2 of them
Select the Spline in the PERSPECTIVE Viewport, and CLICK and DRAG the SPLINE while holding the Shift Key
You should have a dialog box pop up and CHOOSE COPY from the Options, then click OK
***YOU SHOULD NOW HAVE 2 SPLINES IDENTICAL
Modify the NEW SPLINE like in the Pic Below,
I have changed my SPLINE to a RADIAL
Use the OPTIONS in the Toolbox to MODIFY your SPLINE.
Next create a SPHERE from the STANDARD PRIMATIVES MENU
and you can put it where you like as we will be Linking it
With the SPHERE SELECTED goto the ANIMATION TAB at the top of the SCREEN
Choose PATH CONSTRAINT
A LINK PATH LINE will appear and you Click your RADIAL SPLINE to ASSIGN IT
Your Sphere will JUMP onto your Path and its now Assigned to that Path as an Animation
Using the Options in the Toolbox
You can get your SPHERE or any other Shape you design to follow the Path and Use Banking ( like a Jetfighter does ), You can from these options change Speed,Smoothness.
If you click the PLAY Button on the Bottom of the Screen your Sphere or whatever you want as the follow Object will be following the Path...
***If you look at the Rendering Options on the right, You can CHECK/UNCHECK show in Renderer/Viewport, This will hide the Second Spline (The Path) so that it will not show in the Animation/Rendering...
This was a very Simple Tutorial on the Use of PATH CONSTRAINT in 3DS MAX
Attachment below if you want a simple demo Video ( its in QUICKTIME .MOV Format ) cooll;
More to come
Chris
You do not have the required permissions to view the files attached to this post.
Last edited by hungryhounduk on Tue Apr 26, 2011 6:51 am, edited 4 times in total.


Quick Profile
Information
Posts: 2456
Joined: Fri Feb 19, 2010 8:18 pm View Full Profile
Good tutorial, can I ask you what snipping program you are using?
Oh and everyone who uses WMP it does not seem to work :? Worked fine with VLC tho.
Oh and everyone who uses WMP it does not seem to work :? Worked fine with VLC tho.
Quick Profile
Information
Posts: 2870
Joined: Mon Jul 27, 2009 11:58 am View Full Profile
Hey Agust
I am using Screen Capture on my Laptop, then into Photoshop with it to crop etc.
The Video was made as a Apple Quicktime Movie within 3DS Max, so if you have Quicktime it will play fine, I am not sure about others, as i did not test it in them, only Quicktime.
Chris
I am using Screen Capture on my Laptop, then into Photoshop with it to crop etc.
The Video was made as a Apple Quicktime Movie within 3DS Max, so if you have Quicktime it will play fine, I am not sure about others, as i did not test it in them, only Quicktime.
Chris
3 posts
Page 1 of 1
Copyright Information
Copyright © Codenstuff.com 2020 - 2023