Creating Website Templates with Style Sheets>Tutorial
Please post your tutorials for this software in here.


Quick Profile
Information
Posts: 2870
Joined: Mon Jul 27, 2009 11:58 am View Full Profile
Dreamweaver > Creating Website Templates with Style Sheets>Tutorial
Hi All
* I would recommend that you create all your Images that you want to use for your Template before you do his Tutorial.
1. Start DREAMWEAVER or DREAMWEAVER MX
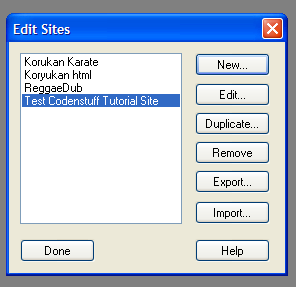
2. First you will need to Establish a Location for your site, Select MANAGE SITES from the SITE MENU to reveal the appropriate dialog box...like pic below
![Image]()
3. Select the NEW Button followed by SITE, This will open the site definition dialog box at the first window...like the pic below
![Image]()
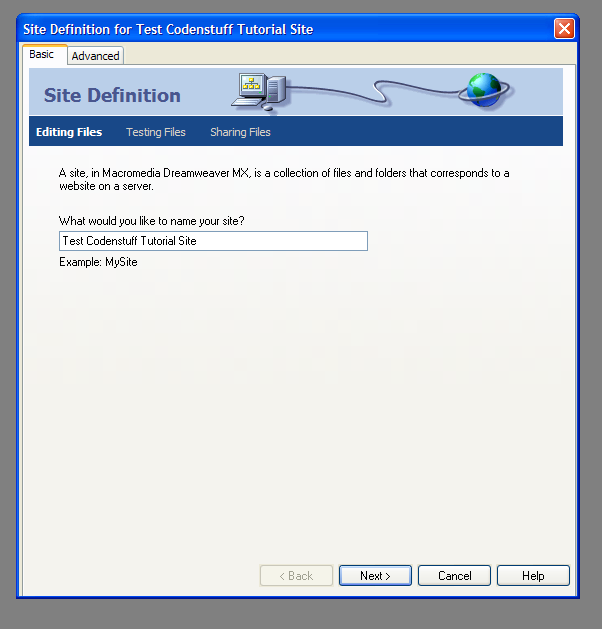
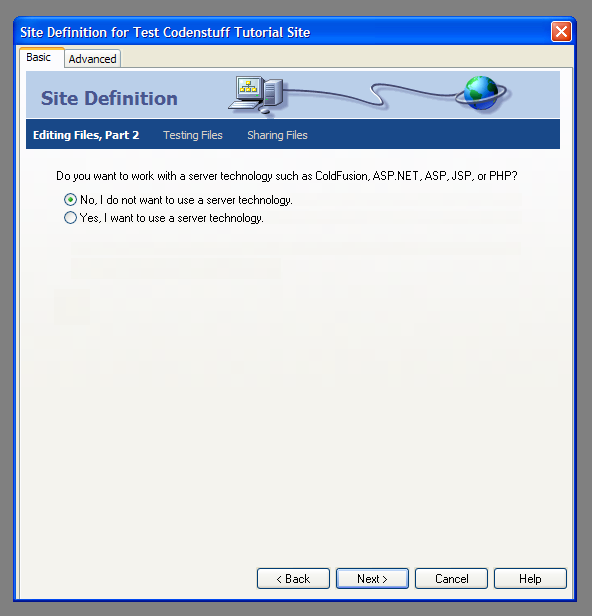
4. The SITE Definition Wizard is broken down into several steps, with the first step giving you the opportunity to NAME your Site, For this Tutorial I have named this site "Test Codenstuff Tutorial Site" Now press the Next Button and select the "NO" Option and press NEXT to continue...like pic below
![Image]()
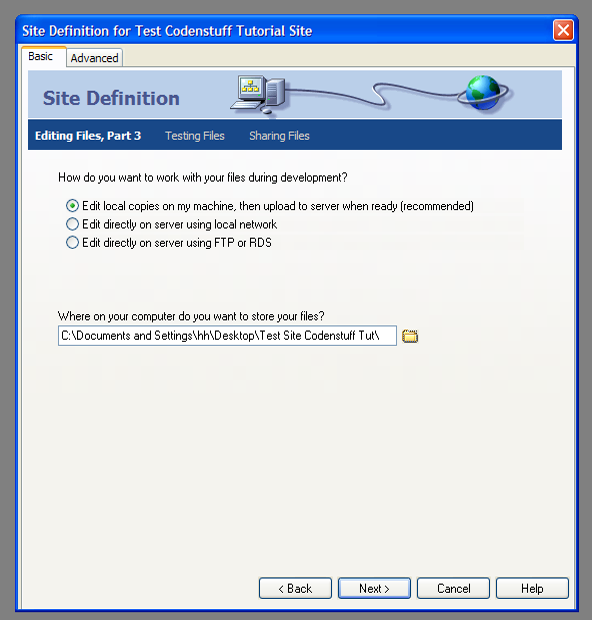
5. The next step will first ask you How YOU WANT TO WORK with your Files _ You will be given 3 EDIT Options, SELECT the EDIT LOCAL COPIES Option, Dreamweaver will show you the LOCATION of your NEWLY CREATED SITE..Hit Next to Continue (or Click the Folder Icon to change to a DIRECTORY of your Choice ) like the Pic below
![Image]()
6. Now select NONE from the HOW DO YOU CONNECT dropdown list and press NEXT to complete the SITE DEFINITION Process...like the Pic below
![Image]()
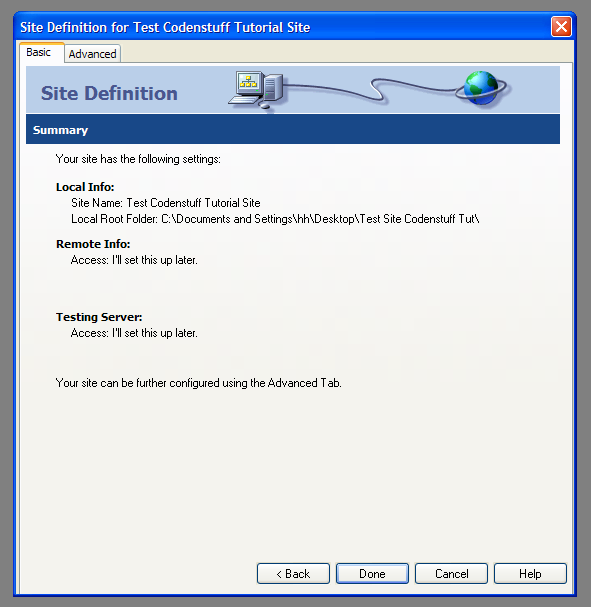
7. This will reveal the SITE DEFINITION SUMMARY DETAILS of your chosen Options, Now press DONE & DONE again to Finish..like pic below
![Image]()
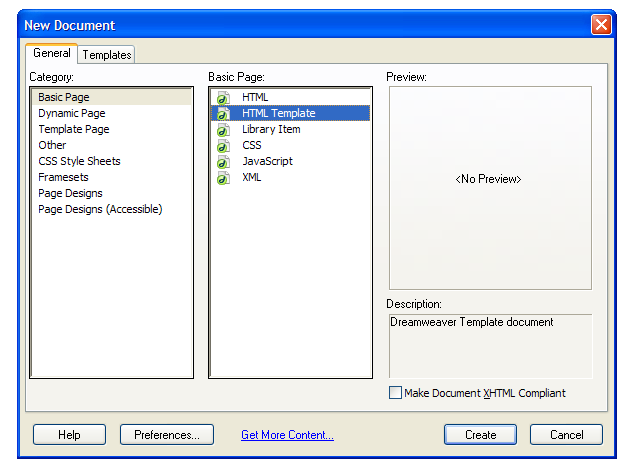
8. The next step is to start creating the basis of your TEMPLATE, First select NEW from the FILE MENU, To open the NEW DOCUMENT Dialog box, From Category SELECT BASIC PAGE Followed by HTML TEMPLATE from the Basic Page Pane. Now press CREATE to Finish...like pic below
![Image]()
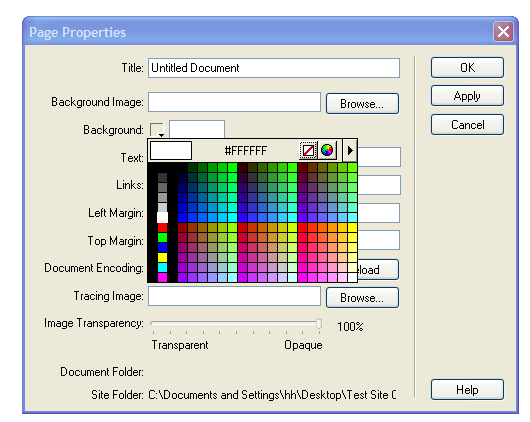
9. Now you will need to start adding the various elements of your TEMPLATE, First add a BACKGROUND COLOR, SELECT MODIFY>PAGE PROPERTIES>APPEARENCE, Now click on the box next to BACKGROUND COLOR, Select WHITE and press OK...like Pics below
![Image]()
![Image]()
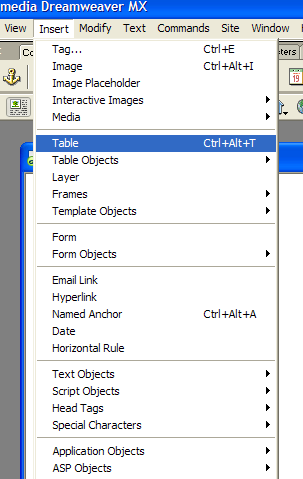
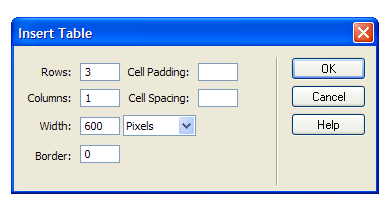
10. Now we are going to CREATE the First TABLE for your TEMPLATE, Select TABLE from the INSERT MENU to open the TABLE Dialog box, For this TABLE we are going to have 3 ROWS and 1 COLUMN with 0 BORDER THICKNESS, when selected press OK to add the TABLE...like pics below
![Image]()
![Image]()
11. The next step is to add the Top (Header) Image and the NAVIGATION BAR Image, Click in the TOP ROW of your TABLE and SELECT your IMAGE from the INSERT Menu, Now browse to the Images Folder ( its best to keep all your Images in a Folder in the SITE FOLDER ) and SELECT your Top (Header) Image, Do the same for the NAVIGATION BAR IMAGE which will go in the 3rd ROW down in your TABLE.
*When you are creating your TEMPLATE you will need to think about what LINKS are needed for the SITE, Across the Navigation Bar image you have put in the 3rd ROW in your TABLE, You are now going to add HOTSPOTS (that will be the LINKS that are the Navigation for your site)
12. Select the NAVIGATION BAR image and in the Properties SELECT THE HOTSPOT TOOL...Pic below
![Image]()
13. Click on the RECTANGLE HOTSPOT and then Click and Drag the HOTSPOT CROSSHAIR over the TEXT on your NAVIGATION BAR...like the pic below
![Image]()
14. The Previous step will open the PROPERTIES for the HOTSPOTS, In the LINKS BOX enter "index.html" In order to complete the NAVIGATION BAR LINKS you will need to repeat this for each HOTSPOT LINK (*these pages do not exist yet and will have to be created )...like the Pic below
![Image]()
15.Now we are going to add another TABLE in the MIDDLE ROW of the TABLE on the PAGE, Click in the MIDDLE ROW of your TABLE and select TABLE from the INSERT MENU and add a TABLE with 2 ROWS and 3 COLUMNS, In the left and right COLUMNS add a Picture....like the pics below
![Image]()
![Image]()
16. EDIBLE REGIONS..Select BOTH MIDDLE COLUMNS ( Click one and hold down Ctrl and click the other too select them both ) and Select TOP from the VERT LIST in the Properties Window, In the TOP COLUMN add an EDIBLE REGION via INSERT and TEMPLATE OBJECTS and name it "indexTop" and another for the bottom ROW called "indexBottom" ...like the Pic below
![Image]()
17. Save your TEMPLATE > SELECT SAVE AS from the FILE MENU to open the SAVE AS dialog box, Name the TEMPLATE "Home" and press SAVE, Once saved you can press Ctrl+S to save the TEMPLATE.
18. STYLE SHEET..Now we are going to add a STYLE SHEET to the INDEXTOP Edible Region to ELIMINATE the need for continual Formatting, First place your Cursor in the Edible Region, UNDER THE DESIGN WINDOW select the CSS Styles Tab, The CSS STYLES TAB allows you to create a NEW STYLE SHEET or attach apreviously created Sheet. To simplify matters we are going to ATTACH A SAMPLE SHEET > Click on ATTACH STYLE SHEET to open the ATTACH EXTERNAL STYLE SHEET dialog box...like the Pic below
![Image]()
19. Now click on the SAMPLE STYLE SHEETS LINK to open the SAMPLE STYLE SHEETS dialog box, Select the FULL DESIGN: ARIAL...Option and press OK, Expand the design window to reveal the details of the STYLE SHEET, To MODIFY double click an Option to see more.
20.
You now have your STYLE SHEET Base to work with, To MODIFY the STYLE SHEET Double Click on the appropriate Label then select your NEW OPTION, Now when you add TEXT to the TEMPLATE the STYLE LIST in the PROPERTIES WINDOW will reveal your Options.
* To finish up you need to SAVE THE TEMPLATE AS BEFORE, Now you can use the "Home.dwf TEMPLATE to create a HTML Page (File>Save As) To add more Pages, You can repeat the previous steps to create A NEW TEMPLATE using the same techniques...
I hope this has shed some light on creating your own site templates with Dreamweaver for those who dont know how too....... cooll;
I have used DREAMWEAVER MX for this Tutorial..............I think Dreamweaver ( not the MX Version ) is roughly the same so if you have that version it should not be a problem to follow this tutorial..
Enjoy
Chris
Hi All
* I would recommend that you create all your Images that you want to use for your Template before you do his Tutorial.
1. Start DREAMWEAVER or DREAMWEAVER MX
2. First you will need to Establish a Location for your site, Select MANAGE SITES from the SITE MENU to reveal the appropriate dialog box...like pic below
3. Select the NEW Button followed by SITE, This will open the site definition dialog box at the first window...like the pic below
4. The SITE Definition Wizard is broken down into several steps, with the first step giving you the opportunity to NAME your Site, For this Tutorial I have named this site "Test Codenstuff Tutorial Site" Now press the Next Button and select the "NO" Option and press NEXT to continue...like pic below
5. The next step will first ask you How YOU WANT TO WORK with your Files _ You will be given 3 EDIT Options, SELECT the EDIT LOCAL COPIES Option, Dreamweaver will show you the LOCATION of your NEWLY CREATED SITE..Hit Next to Continue (or Click the Folder Icon to change to a DIRECTORY of your Choice ) like the Pic below
6. Now select NONE from the HOW DO YOU CONNECT dropdown list and press NEXT to complete the SITE DEFINITION Process...like the Pic below

7. This will reveal the SITE DEFINITION SUMMARY DETAILS of your chosen Options, Now press DONE & DONE again to Finish..like pic below
8. The next step is to start creating the basis of your TEMPLATE, First select NEW from the FILE MENU, To open the NEW DOCUMENT Dialog box, From Category SELECT BASIC PAGE Followed by HTML TEMPLATE from the Basic Page Pane. Now press CREATE to Finish...like pic below
9. Now you will need to start adding the various elements of your TEMPLATE, First add a BACKGROUND COLOR, SELECT MODIFY>PAGE PROPERTIES>APPEARENCE, Now click on the box next to BACKGROUND COLOR, Select WHITE and press OK...like Pics below

10. Now we are going to CREATE the First TABLE for your TEMPLATE, Select TABLE from the INSERT MENU to open the TABLE Dialog box, For this TABLE we are going to have 3 ROWS and 1 COLUMN with 0 BORDER THICKNESS, when selected press OK to add the TABLE...like pics below
11. The next step is to add the Top (Header) Image and the NAVIGATION BAR Image, Click in the TOP ROW of your TABLE and SELECT your IMAGE from the INSERT Menu, Now browse to the Images Folder ( its best to keep all your Images in a Folder in the SITE FOLDER ) and SELECT your Top (Header) Image, Do the same for the NAVIGATION BAR IMAGE which will go in the 3rd ROW down in your TABLE.
*When you are creating your TEMPLATE you will need to think about what LINKS are needed for the SITE, Across the Navigation Bar image you have put in the 3rd ROW in your TABLE, You are now going to add HOTSPOTS (that will be the LINKS that are the Navigation for your site)
12. Select the NAVIGATION BAR image and in the Properties SELECT THE HOTSPOT TOOL...Pic below
13. Click on the RECTANGLE HOTSPOT and then Click and Drag the HOTSPOT CROSSHAIR over the TEXT on your NAVIGATION BAR...like the pic below
14. The Previous step will open the PROPERTIES for the HOTSPOTS, In the LINKS BOX enter "index.html" In order to complete the NAVIGATION BAR LINKS you will need to repeat this for each HOTSPOT LINK (*these pages do not exist yet and will have to be created )...like the Pic below
15.Now we are going to add another TABLE in the MIDDLE ROW of the TABLE on the PAGE, Click in the MIDDLE ROW of your TABLE and select TABLE from the INSERT MENU and add a TABLE with 2 ROWS and 3 COLUMNS, In the left and right COLUMNS add a Picture....like the pics below

16. EDIBLE REGIONS..Select BOTH MIDDLE COLUMNS ( Click one and hold down Ctrl and click the other too select them both ) and Select TOP from the VERT LIST in the Properties Window, In the TOP COLUMN add an EDIBLE REGION via INSERT and TEMPLATE OBJECTS and name it "indexTop" and another for the bottom ROW called "indexBottom" ...like the Pic below
17. Save your TEMPLATE > SELECT SAVE AS from the FILE MENU to open the SAVE AS dialog box, Name the TEMPLATE "Home" and press SAVE, Once saved you can press Ctrl+S to save the TEMPLATE.
18. STYLE SHEET..Now we are going to add a STYLE SHEET to the INDEXTOP Edible Region to ELIMINATE the need for continual Formatting, First place your Cursor in the Edible Region, UNDER THE DESIGN WINDOW select the CSS Styles Tab, The CSS STYLES TAB allows you to create a NEW STYLE SHEET or attach apreviously created Sheet. To simplify matters we are going to ATTACH A SAMPLE SHEET > Click on ATTACH STYLE SHEET to open the ATTACH EXTERNAL STYLE SHEET dialog box...like the Pic below
19. Now click on the SAMPLE STYLE SHEETS LINK to open the SAMPLE STYLE SHEETS dialog box, Select the FULL DESIGN: ARIAL...Option and press OK, Expand the design window to reveal the details of the STYLE SHEET, To MODIFY double click an Option to see more.
20.
You now have your STYLE SHEET Base to work with, To MODIFY the STYLE SHEET Double Click on the appropriate Label then select your NEW OPTION, Now when you add TEXT to the TEMPLATE the STYLE LIST in the PROPERTIES WINDOW will reveal your Options.
* To finish up you need to SAVE THE TEMPLATE AS BEFORE, Now you can use the "Home.dwf TEMPLATE to create a HTML Page (File>Save As) To add more Pages, You can repeat the previous steps to create A NEW TEMPLATE using the same techniques...
I hope this has shed some light on creating your own site templates with Dreamweaver for those who dont know how too....... cooll;
I have used DREAMWEAVER MX for this Tutorial..............I think Dreamweaver ( not the MX Version ) is roughly the same so if you have that version it should not be a problem to follow this tutorial..
Enjoy
Chris


Quick Profile
Information
Posts: 1117
Joined: Mon Sep 07, 2009 8:11 pm View Full Profile
OH god the tutorial is huge. I'm thinking about being a Web Designer you know? I'm working hard on HTML for creating websites, I've many books about "Web Designer for Morons" etc
This tutorial will come useful for me.
This tutorial will come useful for me.
Quick Profile
Information
Posts: 2870
Joined: Mon Jul 27, 2009 11:58 am View Full Profile
Hi Nery
Actually its really easy
I know i often say that but it really is and i'm sure you will pick it up in no time.
Chris
Actually its really easy
I know i often say that
Chris
Quick Profile
Information
Posts: 1117
Joined: Mon Sep 07, 2009 8:11 pm View Full Profile
Seriously you'll have to give me some hints for where I should start: I love arts, I love drawing, I love abstract stuff, I'm a art lover and I would like to merge Art with Programming so HTML and Web Designing should be the best option.
May you give me some hints from where I should start?
May you give me some hints from where I should start?
Quick Profile
Information
Posts: 2870
Joined: Mon Jul 27, 2009 11:58 am View Full Profile
Seriously you'll have to give me some hints for where I should start: I love arts, I love drawing, I love abstract stuff, I'm a art lover and I would like to merge Art with Programming so HTML and Web Designing should be the best option. Maybe you give me some hints from where I should start?Hi Nery
If you are good at Drawing, then you might want to think about being a Graphic Designer/Web Designer because Companys that deal with the Web "Love" people that have got Talent, as in Drawing and you will find that they are always in demand as you can create Original Artworks for print, as in ( Flyers,Postcards,Menus Logos,Letterheads,Cards the list goes on and on ) and whatever you design for Print can always be put on the web.
And If you Import your Drawings into Photoshop or Flash or Illustrator you can produce fantastic results like these pics below....These have been taken into Flash, and then Recolored and you can end up with Awesome results like this...This can be done In Photoshop as well, you add the lines on a new Layer ( Remember the PEN TOOL cooll; ) as well as the colors on New Layers...and it can be done in Illustrator as well ( PEN TOOL cooll; )as line Artwork then import it into Photoshop or Flash to add the Colors.
You really just got to think what you are best at then go from there..........If you can create things like this above from your Memory then you will find no problem getting a really good Job... cooll;
Create a Portfolio of your work: ie, Drawings,Paintings or any other media you have got and such as Computer created Artwork, and make a nice Portfolio of it all and even ( Photograph it, if its too big to have in a portable Portfolio )also convert it all to PDF if you can as Employers can easily look at your work as PDF files are so good they will keep all the color and everyting else intact.
Hope this helps
Chris
Last edited by hungryhounduk on Wed Jun 16, 2010 9:38 am, edited 1 time in total.
Quick Profile
Information
Posts: 1117
Joined: Mon Sep 07, 2009 8:11 pm View Full Profile
I've been working on Abstract Art for producing Wallpapers and Forum Signatures for example but I'm going to train my drawing and try producing nice stuff as you've done with that 2 cartoon characters. I'll have to get a digital pen or whatever it is called (I don't know exactly its name...), here's a picture of one:
I'm good at making montages with abstract stuff over it, I also retouch photos for example removing facial imprefections or adding some abstract bright to landscapes. I'm horrible drawing with my mouse but with a pen like shown in the screenshot above I'm sure I'll draw as I draw in paper.
Thank you for your hints.
You do not have the required permissions to view the files attached to this post.
Quick Profile
Information
Posts: 2870
Joined: Mon Jul 27, 2009 11:58 am View Full Profile
Hi Nery
Yes a Graphic Pen like the one above is a must for this type of Artwork as you get much more control over what you draw, Stick with it and you will find the results very rewarding
Excellent
Chris
Yes a Graphic Pen like the one above is a must for this type of Artwork as you get much more control over what you draw, Stick with it and you will find the results very rewarding
Excellent
Chris
Quick Profile
Information
Posts: 1117
Joined: Mon Sep 07, 2009 8:11 pm View Full Profile
Yes I'm decided to buy one because drawing with mouse is very painful.

Quick Profile
Information
Posts: 338
Joined: Sun Jan 03, 2010 8:36 am View Full Profile
Nery wrote:OH god the tutorial is huge. I'm thinking about being a Web Designer you know? I'm working hard on HTML for creating websites, I've many books about "Web Designer for Morons" etcYour going to need more then HTML. Your going to need to know everything...
This tutorial will come useful for me.
HTML
CSS
DHTML
XML
Javascript
PHP
and probs 10 others...

Quick Profile
Information
Posts: 1117
Joined: Mon Sep 07, 2009 8:11 pm View Full Profile
tedhead2 wrote:I know, I've been looking for what I should use to create web pages, an HTML editor that contains all that programming languages... Any clue?Nery wrote:OH god the tutorial is huge. I'm thinking about being a Web Designer you know? I'm working hard on HTML for creating websites, I've many books about "Web Designer for Morons" etcYour going to need more then HTML. Your going to need to know everything...
This tutorial will come useful for me.
HTML
CSS
DHTML
XML
Javascript
PHP
and probs 10 others...
Copyright Information
Copyright © Codenstuff.com 2020 - 2023